
Easiest-Ever Driving Light Installation
EASIEST-EVER DRIVING LIGHT INSTALLATION
Wiring up a set of driving lights has traditionally been a nightmare! But I’m going to show you how easy it is to wire up your new Adventure Kings LED or Laser spotlights or lightbar using the Kings Plug n Play Smart Harness. And the best part is – there’s NO cutting, soldering or drilling involved – it’s so incredibly easy!
In fact the only thing you’ll need are some spanners to undo your battery terminals, a handful of cable ties to secure the wiring once it’s in place, and a wire coat hanger and a bit of tape to help run the switch into your dash.
|
PARTS REQUIRED |
Driving lights or lightbar, Kings Plug n Play Smart Wiring Harness |
|
TOOLS REQUIRED |
Socket and spanner sets, drill and phillips-head bit, pliers |
|
MATERIALS REQUIRED |
Metal screw, electrical tape, cable ties, wire coat hanger |
|
TIME REQUIRED |
2 Hours |
PROJECT OVERVIEW
STEP 1

First let’s mount the wiring harness into the engine bay. Choose somewhere the same side as your battery, with a good amount of room. Typically I’d install this onto an inner guard using an existing bolt or a metal screw. The only other consideration is you need it to be close enough to the battery that these red and black wires can reach the battery terminals.
STEP 2
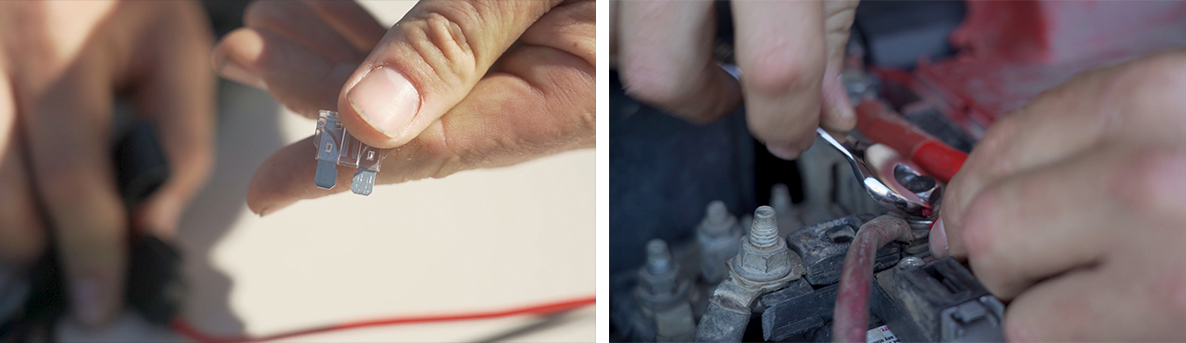
Double-check that you’ve got the fuse removed from the fuse holder, and you can go ahead and connect the red and black wires to corresponding red and black terminals on the battery. Make sure that the connect is tight and there’s a good fit with plenty of physical contact between these fork terminals and the battery posts.
STEP 3

The next step is to connect to the back of your headlight with one of the supplied in-line headlight adapters. Locate and remove the plug from the back of your headlight. Gently but firmly wiggle the connector off the back of the headlight, and then connect the piggyback adapter to the back of the headlight, and to the plug you just removed.
STEP 4

Now, neatly feed the white T-plug down through your engine bay to the headlight so you can connect it to the corresponding white plug on the end of the piggyback adapter. Take your time to tuck it away neatly so it doesn’t hang loose, but don’t cable tie or tape it into position yet – we’ll do all the wiring together at the end. Push the two white connectors together until they click into place.
STEP 5

Now we’re going to run this grey plug with the orange seal down to the front of the vehicle to connect to the spotlights or lightbar. Follow the path you ran the headlight cable down for a neat install, and then take a bit of time to find the best way from the engine bay out to the front of the vehicle. Push the connector into the light until it clicks firmly in place. Leave the grill or access panel off for the moment.
STEP 6

Remove the three wires off the back of the switch, so just to make it easy to remember which way they go, we recommend taking a couple of photos of the front and the back of the switch, showing which pins the three coloured wires go to in relation to the end of the switch that this little LED light is. Tape the wiring to your coat hanger, locate a rubber grommet that wiring passes through and feed the end of the coat hanger through it alongside the other wires.
STEP 7

Now, decide where you’re going to mount the switch. Look for one of these blanking panels – with a thin screwdriver they’ll usually pop straight out. Run the wiring around the back of the dash and the centre console as needed, feed it up through the holes and refit to the correct pins on the back of the switch, taking care to refit the insulating sheaths properly.
STEP 8

Now you can return to the engine bay and refit the fuse into the fuse holder. Make sure it’s pushed in until it’s completely snug. Your lights are now fully connected and it’s time to give them a test! Start the car, turn your lights on and hit the high beams. The driving lights should turn on and off with the in-car switch, and should also cancel when you dip back to low beams.
STEP 9

The final step is to now go through your install and tidy up all your work. Fit the in-car switch snugly into place, and spend a bit of time with cable ties securing the wiring neatly in the engine bay. And that’s it – your new Adventure Kings LED lightbar or driving lights are installed – I told you it was easy!
Related Products
